FamiGuard Support: Monitor Devices with Others' Permission.
So, how to take a screenshot on a Samsung laptop?
This is one of many common questions that users always ask, especially if they own a brand-new Samsung laptop. You see, Samsung laptop does work like any other laptop. It has the same key settings and also shortcuts.
This article will explain 10 ways to take screenshots on a Samsung laptop. Let's take a closer look and determine which is perfect for you.
Table of Contents
Part 1: 3 Tricks to Take Full-Screen Screenshots on Samsung Laptop
The most basic and quickest method you can do is to utilize the default Windows key combinations. Windows already prepared the buttons to take screenshots. In fact, there are some of them that we'll mention below, such as:
Method 1: Press the "Print Screen" Keys
So, how to screenshot on Samsung laptop windows? The first thing you can do is press the Print Screen button. Don't know where to find it? It's right on this side:
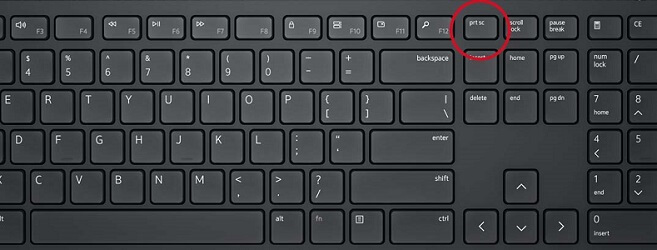
This button is usually located on the upper right side of your keyboard (please note that each laptop could have different keyboard layouts). And it's easy to find, actually, since it's already signified with the word "PrtScr" or PrintScreen, which is the short version of Print Screen.
Step 1: Now, what you need to do is to press the Print Screen button. You may notice that nothing is happening, which is pretty normal.
Step 2: After you press the button, Windows is already taken the screenshot.
Step 3: Then all you need to do is open Paint. Most laptops are already installed with Paint, so search for it in your system. Once you find it, open it.

The Paint will be blank like this:

So, after you click the Print Screen button, it's now time to paste it. Simply press the Ctrl + V buttons at the same time.

There it is; the image you screenshotted is now displayed on Paint. Now you can reconfigure the picture by either cropping it, adding text to it, or others. After you have done this, click Save, and put it in any location you wish.

Method 2: Press the "Ctrl + Print Screen" Keys
The next method you can do is to press Ctrl and Print Screen buttons together. This will make Windows capture the whole screen, just like the above method. After your press the buttons, you have to paste it into an image editor app installed on your computer. But to make things easier, just use Paint since every Windows version usually has it.
Now, after you paste the picture, simply click save to store it in any location you wish. You can either save it under the Picture folder or the other folders in your storage.
Method 3: Press the "Windows + Print Screen" Keys
The third method you can try as a solution to print screen on Samsung laptop is by pressing Windows and Print Screen buttons simultaneously. By doing so, you'll capture a specific part of the screen. The screen will turn black for a second, and the image will be captured.
And similar to the two methods above, you have to open Paint to show the captured image. So, do the same thing, and then save the image as usual.
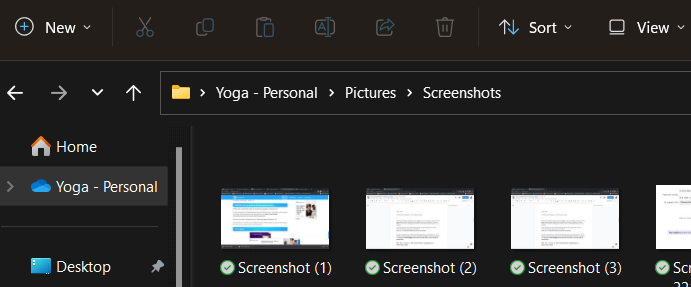
For the location, you can find the images captured using Windows + Print screen keys in the Picture/Screenshots folder. You can move the images to the other folders if you want.
Part 2: 4 Tricks to Take Partial-Screen Screenshot on Samsung Laptop
Aside from the basic steps above, you can also use the advanced methods that involve using Window's default tools, such as the Gaming mode and Snipping tool to have partial-screen screenshots. Here are some of them:
Way 1: Press the "Alt + Print Screen" Keys
The following method you can do is to press the Alt and Print Screen keys.
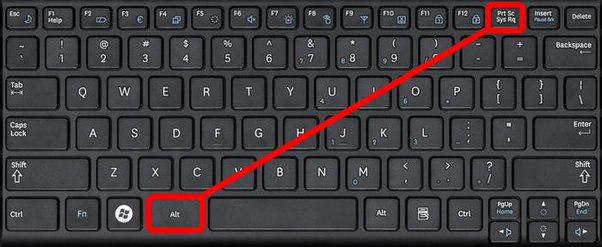
This will make Windows capture only the active screen. If you open multiple windows, the image captured is only for the tab you open right now. After pressing those two buttons, open Paint again and paste the picture.
Then, save the picture in the desired location.
Way 2: Press the "Windows + G" Keys
The next method you can try to capture the screen is using the Game Bar. This feature exists in current Windows versions and enables easy access for gamers to capture their gameplay.
A simple UI will come up by pressing the Windows and G buttons.
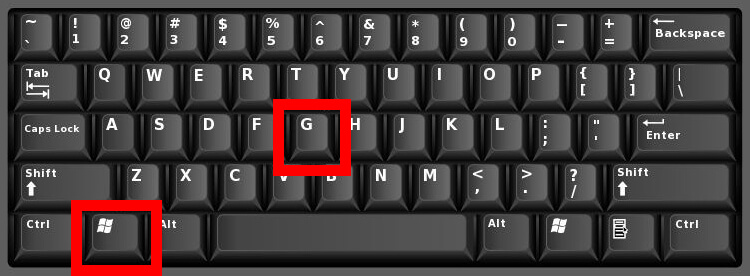
To capture the screen, you can select the Capture menu. All screenshots and videos will be saved under the Pictures or Videos folder.

Way 3: Use Windows Snipping Tool
The third method is by using a tool called Snipping Tool. You don't have to install anything to get it to work. The snipping tool is already installed by default, so all you have to do is to open it in the Start menu.
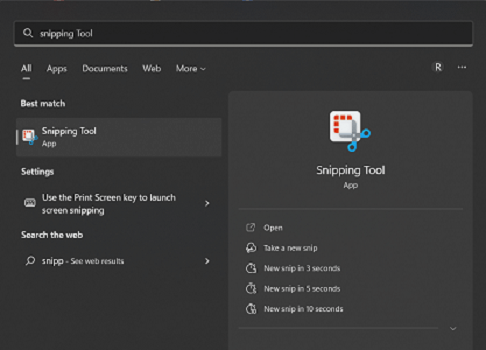
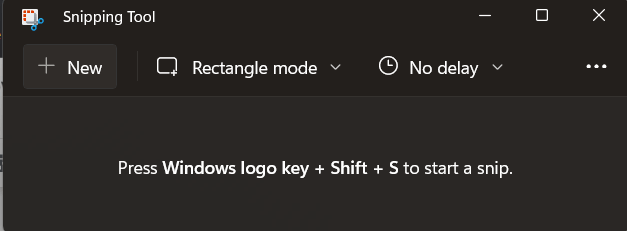
To capture the images, you can select NEW and start adjusting the capture zone. To save it, simply click Save or use Ctrl+S.
Way 4: Use Windows Snip and Sketch Tool
If you have an older version of Windows, you can use a tool called Snip and Sketch. It works basically the same as Snipping Tool but with an older UI.
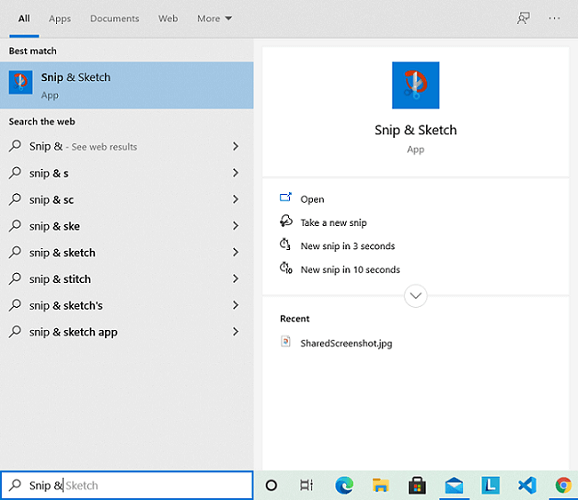
You can search for it in the start menu, open it, and start capturing the screen. Select New and adjust the capture zone to your wish. After you finish, simply click Save to store the image on your device.
Part 3: How to Screenshot on Samsung Laptop with Third-party Screenshot Apps
If you're looking for another solution to screenshot on Samsung laptop, third-party apps can also be the answer. Here are some of the recommended ones:
1. Snagit
The first app you can use is Snagit. Snagit is considered one of the most commonly used tools in Windows 11. People are basically using it as a tool to capture videos and images. It does have some advanced features, including picture and video editing tools that might be useful for quick edits.
Here's how to use it:
Step 1: Download the tool first at its official website
Step 2: Run the program as admin, and continue by clicking Capture. Now capture the screen.

Step 3: Drag the capture area
Step 4: Click the camera icon to capture the image

Step 5: Select File > Save to store the captured image on your device.
Step 6: You can also share the image with others by clicking Share.
2: Lightshot
Another app we'd like to recommend is Lightshot. Similar to the tool above, this tool is intended for capturing footage. It works in Windows 10 and also the latest version of Windows. The screenshots you've taken can be uploaded directly through links or URLs in case you want to share them with your team or peers. Here are the basic steps you need to take:
Step 1: After you install the app, access Lightshot by clicking the icon in the taskbar

Step 2: Now, drag the capture zone
Step 3: There, you can find different buttons with various functionalities. Choose the Save button to store the image in your storage.

The saved images will be placed under the app's folder, so make sure to check them afterward.
And those are the steps we can share to take screenshots on Samsung laptops. Hopefully, the methods above can help you in capturing the computer screen. Good luck!
3: FamiGuard Monisen
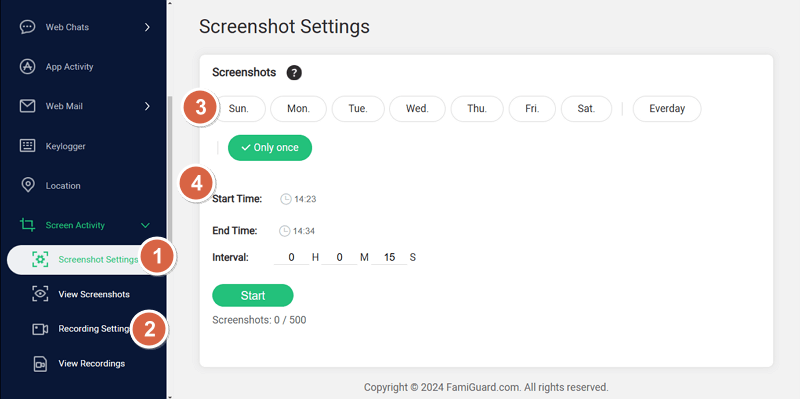
The third app to take a screenshot on desktop computer is FamiGuard Monisen. This app is best among these three apps for it allows you to capture screenshots on others' computers and check what they are doing on the computer. If you are looking for an app, which can do screenshot on a desktop computer and , we greatly recommend this app for you! And, it has won uncountable phrases from thousands of users.
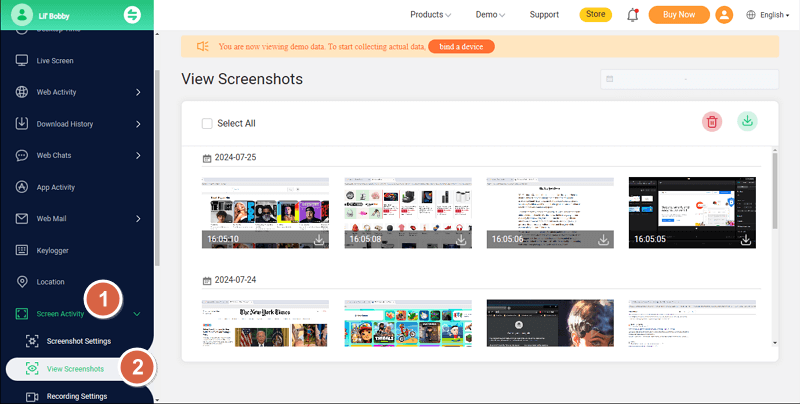
The screenshots taken by FamiGuard Monisen is . As for the intervals, it totally depends on your own requirements. If you want, you can take automatic screenshots every five minutes with breaks of fifteen seconds.
FAQ about Screenshots on Samsung Laptop
1. How do you screenshot on a Samsung Chromebook laptop?
To take a screenshot on a Samsung Chromebook, press Ctrl + Windows key (a rectangle with two lines on the right). This captures the entire screen. For a partial screenshot, press Ctrl + Shift + Windows key and select the area you want to capture.
2. How do I take a screenshot with my Samsung?
On Samsung smartphones, press the Power and Volume Down buttons simultaneously to take a screenshot. You can also use Palm Swipe to capture the screen by swiping your hand across the display if this feature is enabled in Settings > Advanced Features > Motions and Gestures.
3. How to take a screenshot in PC?
On a PC, press the Print Screen (PrtScn) key to capture the entire screen. Pressing Alt + Print Screen captures only the active window. You can paste the screenshot into an image editor like Paint or Word by pressing Ctrl + V.
4. How to take a screenshot on Windows 11?
In Windows 11, press Windows + Print Screen to capture the entire screen and save it to the Screenshots folder in Pictures. For a specific area, press Windows + Shift + S to open the Snipping Tool, then select the portion of the screen you want to capture.
Conclusion
In this post, we have provided ten different ways to take screenshots on Samsung laptop, and these tricks are suitable for many versions of Windows. So you don't need to worry that if you are using a older Windows system. For employers and concerning parents, having needs to take screenshots of your employees or kids' laptops, FamiGuard Monisen be will your wonderful choice.


